Single Sign-On with AWS Cognito and Azure Active Directory
How to SSO, SAML, AD and some other helpful knowledge bites 🍓
3 min readWhat is Single Sign-On, SSO or SOS? 🤪
Single Sign-On (SSO) is increasingly used by organisations to manage user access to company owned applications for (1) security reasons and (2) to improve user experience as the user does not have to re-login to multiple applications once their identity is validated.
What is SAML? 🙀
SAML, or Security Assertion Markup Language, is one of the SSO solutions that validates and authenticates user credentials. It is
a protocol or set of rules that applications use to exchange authentication information with the SSO service. SAML uses XML, a browser-friendly markup language, to exchange user identification data. SAML-based SSO services provide better security and flexibility, as applications do not need to store user credentials on their system
What's happening in the authentication flow? 🧐
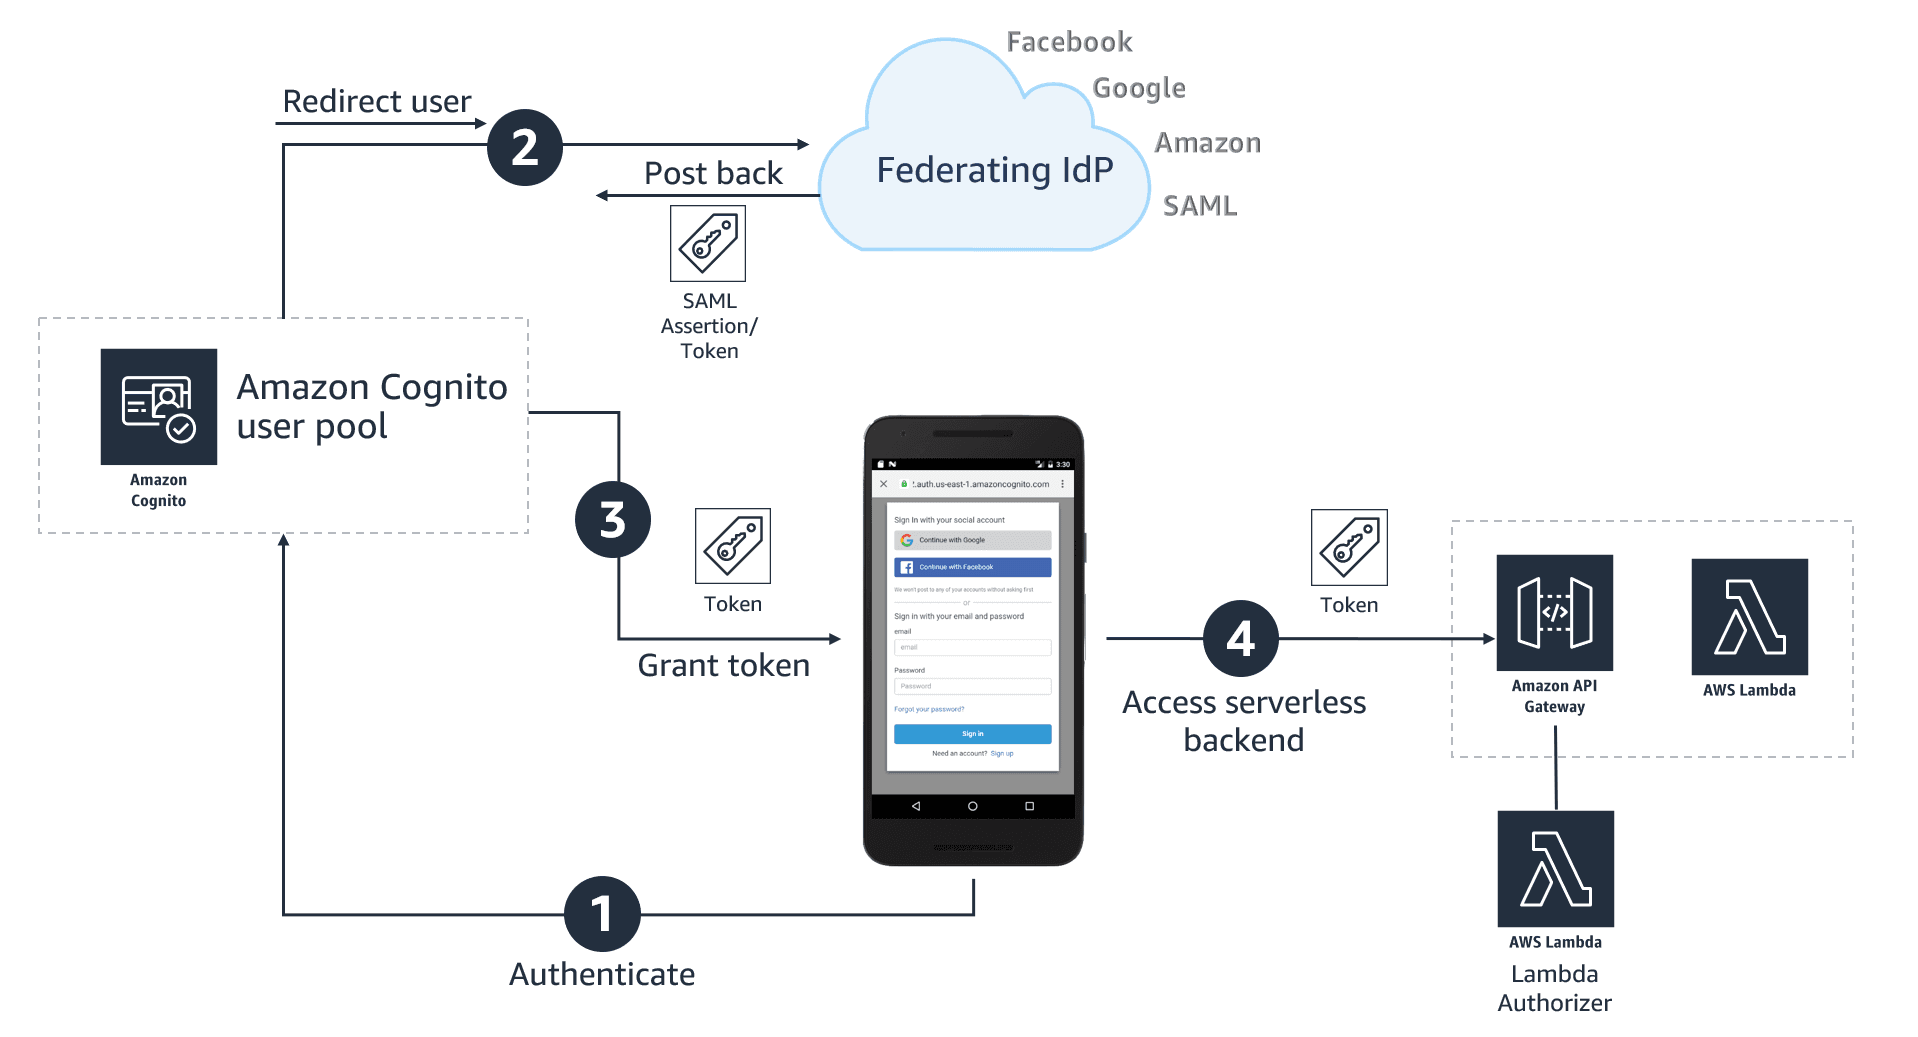
- User logs in to application
- User is redirected to Identity Provider (IdP) Azure
- User authenticates with Azure
- Azure Active Directory (AD) checks if user credentials exist and are correct
- Upon successful authentication, "a SAML assertion or token containing user’s identity details to an Amazon Cognito user pool"
- "Amazon Cognito user pool issues a set of tokens to the application"
- "Application can use the token issued by the Amazon Cognito user pool for authorized access to APIs protected by Amazon API Gateway"
What's needed to integrate AWS Cognito with Azure AD? 🤓
- Create an Amazon Cognito user pool and copy the user pool id for later 😉
aws cognito-idp create-user-pool --pool-name <minhbits-user-pool-name>
- Add domain name to user pool, so you can use Amazon Cognito hosted UI for login and logout
aws cognito-idp create-user-pool-domain \
--domain <minhbits-stg> \
--user-pool-id <minhbits-user-pool-id>
- Now prepare the Identifier (Entity ID) and Reply URL in the following format for Azure
// Identifier (Entity ID)
urn:amazon:cognito:sp:<minhbits-user-pool-id>

// Reply URL
https://<minhbits-stg>.auth.<eu-central-1>.amazoncognito.com/saml2/idpresponse
- Finally it's time to go to Azure and create the connection 🐼
Go to Enterprise Applications and click on
- New Application
- Create your own application
- Create

In Getting Started click on 2. Set up single sign on and then SAML

Click Edit in Basic SAML Configuration section and enter
- Identifier (Entity ID)
- Reply URL

Copy in SAML Certificates section the App Federation Metadata Url

- We are ready to go back to AWS and add Azure AD as an identity providers
aws cognito-idp create-identity-provider \
--user-pool-id <minbits-user-pool-id> \
--provider-name=<minbits-azure-ad-idp> \
--provider-type SAML \
--provider-details MetadataURL=<minhbits-meta-data-url-copied-from-azure-ad>
- Almost done, we just need to create the app client to be able to use Amazon Cognito hosted UI
aws cognito-idp create-user-pool-client \
--user-pool-id <minhbits-user-pool-id> \
--client-name <minhbits-stg> \
--no-generate-secret \
--callback-urls "<https://www.minhistryofcloud.com/>" \
--allowed-o-auth-flows code \
--allowed-o-auth-scopes openid\
--supported-identity-providers "<minbits-azure-ad-idp>" \
--allowed-o-auth-flows-user-pool-client
- Lastly, check it out via Cognito hosted UI 😉
Time for Feierabend! 💪😎